Navigate
- - -
1955 SE Oak Drive, Ankeny, IA 50021
© 2026 Taylored Expressions

Hey, crafty friends! It’s Taylor here today, which means that it’s the first day of sneak peeks for our April release! The Creative Team and I have been stamping up a store with this month’s release and I can’t wait to share what we’ve been up to. There’s going to be LOTS to see and LOTS to get excited about as we explore love & marriage, baby, mom, teacher, grad, and more! There’s definitely something for everyone! Here’s an ‘at-a-glance’ look at the April Release and what you can expect from sneak peeks this week:

Our Sending Smiles Bundle is FREE with purchases of $40+ from April 4th – April 7th. The bundle includes 15 Toffee envelopes, 15 Sugar Cube envelopes, and 30 envelope seals ready to be customized with your stamps. Simply stamp, seal, send, and Share Joy!
*The bundle will not appear in your cart, but will automatically be included with qualifying orders.
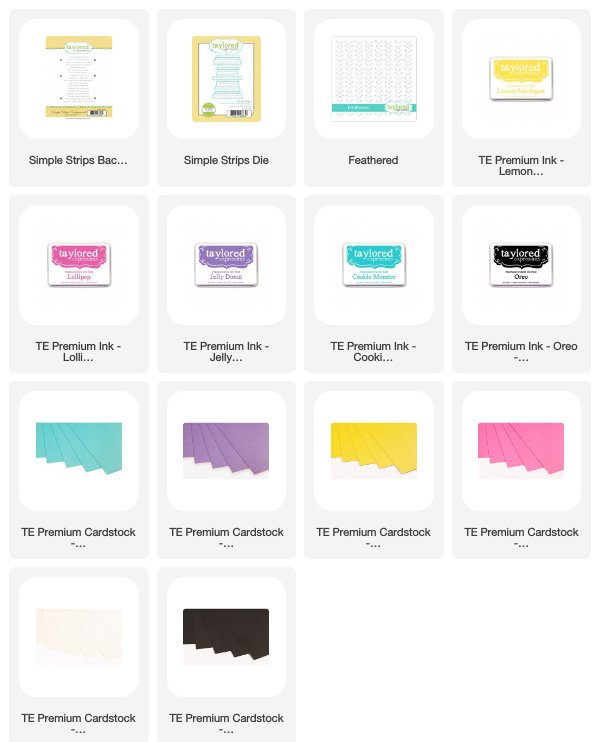
In today’s video, I’m sharing a simple way to build your card stash by pairing two of our newest stencils with the new Simple Strips Background and coordinating die. With the Simple Strips Background and coordinating die, you’ll have 18 perfectly flagged sentiments with one trip through your die cut machine! I’ll also share how you can cut the sentiments apart using the My Sweet Petunia Cut-Align Ruler for a straight-edged finish.
Now let’s take a closer look at the projects that I shared in the video! Perhaps my favorite new product of this release is the Simple Strips stamp set and coordinating die (pictured below). It makes simple work of creating sentiment strips for tons of different occasions – making it the ultimate tool for building your card stash. Aligning each sentiment perfectly for die cutting is also made easy with the 6 alignment squares that are built into the stamp.


One of my favorite gifts to give to my non-crafty friends and family is a set of notecards for them to send out. A quick and easy way to do that is by mass-producing stenciled backgrounds! I love coming up with different ink blends using our inks that have superior blendability (I know that’s not a word, but it should be!). I created the set of notecards below with the Feathered Stencil and four different colors of ink.


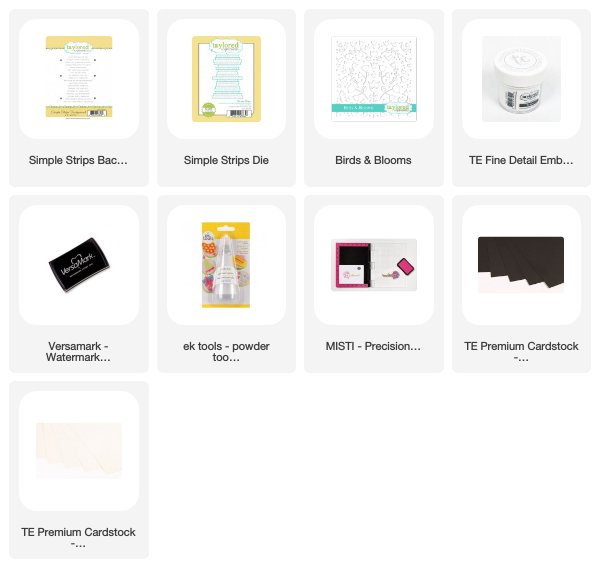
My next set of cards uses the new Birds & Blooms stencil and four different ink blends. I love experimenting with different color blends and while the video only focuses on the blend for the purple background, I’ve shared the ink blend for each of the cards below in case you want to achieve the same look. The sentiments on these cards were embossed with our Fine Detail White Embossing Powder onto Oreo cardstock and then stripped apart with the coordinating Simple Strips die.

I love to create notecard sets to give as gifts and mass-producing stenciled backgrounds is an easy way to do that. You can create many different color blends and cards quickly and easily!

I thought I would share the color blends that I used on this set of cards to give you a jumpstart on doing some color blending with stencils on your own. The color blend for the card on the left is Pineapple and Lollipop inks. The color blend for the card on the right is Candy Corn, Guava, and Plum Punch inks.

The color blend for the card on the left is Confetti Cake, Cookie Monster, Blue Raspberry, and Blueberry. The color blend for the card on the right (the one shown in the video) is Lavender Glaze, Jelly Donut, and Eggplant. Because our ink collection perfectly matches our cardstock it was easy to select a color from the blend for each of the card bases.
You also might find it helpful to keep a journal of favorite color blends. That way when you are trying to decide where to start, you can page through options to see if something jumps out at you to try on your project!

There are lots of different ways to use the Simple Strips background so I wanted to share a few more ideas from the design team.

Gayatri Murali stacked several embossed sentiments onto a colorful background that she designed using the previously released Color Me Background stamp. I love how she combined five different sentiments to create this anniversary card!

Noriko Fairchild always has something unique up her sleeve and I love how she used the Simple Strips to create an entire background on this stunning card! Not only is her use of the Simple Strips unique, but I’ll be filing away her unique color combination for future use! Psst: it’s Buttercream Frosting, Pineapple, Blue Raspberry, Toffee, and Peaches & Cream.
Heather Nichols is making her Taylored Expressions product design debut this month and I could not be more excited! Her first collection includes the new Simply Stamped – Feathers stamp set and coordinating die collection. I know the name of the set says “Simply Stamped – Feathers”, but it will always be known to me as “Heather’s Feathers”. That’s perfect, right?


The Simply Stamped – Feathers stamp set includes two different size feathers and several mix and match elements to create your own custom feather designs. You can also get the coordinating Simply Stamped – Feathers dies to cut out your feathers. In addition, Heather designed the Feathered stencil that I used on my rainbow stenciled notecards above! It matches perfectly with the whole feather collection!
Since these are “Heather’s Feathers” it seemed fitting to start with a few projects that she envisioned using her newest designs!

This pair of feather cards that Heather created shows off her rustic style just perfectly! The card on the left uses the Feathered stencil with a border of die cut feathers down the side of the card. And don’t miss the crumpled cardstock on the right that adds the perfect distressed touch to enhance the rustic design. The sentiments on both cards are from the new Wild and Free stamp set.

Melody Rupple shows off the same stamps and dies with equally beautiful results in a bit brighter color theme! I can’t wait to show off more amazing feather combinations throughout the week. Speaking of which, we have some very special guests joining us later this week to celebrate Heather’s first product launch. I’m teasing you with a few sneak peeks below… any guesses who they might be?

And last (for today at least!), I want to introduce the new Folksy Flowers Cutting Plate and Drop a Note stamp set:


Folk art is a popular trend that we’ve been following for a while now and I’m excited to continue this theme in our April Release with the Folksy Flowers Cutting Plate! The cutting plate was designed with a solid space fit for the greeting of your choice. The new Drop a Note stamp set with sentiments appropriate for many occasions will fill that void.

Kim Singdahlsen combined trendy colors to create this beautiful card using the Folksy Flowers Cutting Plate and Drop a Note sentiment. Kim layered a piece of Sugar Cube cardstock behind the die cut cardstock and added color to the image openings with Copic marker. This is definitely another color combo I’ll be filing away – visit Kim’s blog for the full lineup of cardstock and Copic colors she used.

Jill Hawkins created this bright and colorful card using the Folksy Flowers Cutting Plate die. She cut the design from several different colors and inlaid the cardstock back into the die cut openings. She also shows that sentiments from the previously released Folk Art Phrases stamp set fit perfectly in the solid space of the design as well.
That’s all for today’s new product and project features, but before I go, I have an opportunity for you to win it before you can buy it by answering my Question of the Day…

My question of the day is: Who gets the biggest kick out of your handmade cards? Who is your biggest non-cardmaking cheerleader? For me, it’s my sister’s boyfriend, Frankie. He raves about my cards and displays them on shelves in his house. He tells all of his friends what I do – I’m sure they really have no clue what goes into making a card – but it’s nice to know they are loved and appreciated! However, I don’t give him sets of notecards to send out because I have a feeling he would hoard them for his displays. LOL! Looking forward to reading your stories!
Today I’m giving away the Simple Strips Background and your choice of one of the new stencils!
Leave your comment before Wednesday, April 3rd at 8PM CST. One comment per person. Each comment will also be entered into our Grand Prize drawing for a $50 gift certificate! Winners are chosen at random and and announced on the TE blog on Thursday, April 4th.
Make sure you check out what the rest of the Taylored Expressions Creative Team projects using today’s featured products! These ladies blow me away every.single.month! See you back here tomorrow with more new products and inspiration!