
Jun 11, 2014
Key Ingredients Showcase: Keia Shipp-Smith
It’s a happy day here on the TE Blog as we welcome Key Ingredients designer, Keia Shipp-Smith to share the fabulous projects that have been keeping her busy this summer! I’m always looking for fun handmade gift ideas and Keia is showing us several ideas along with a fun tutorial! So grab your favorite summer beverage and get ready to be inspired!


Keia’s Notes: I created this month’s showcase around gift giving. I find late
spring and summer bring with it a flurry of gift giving activity: Teacher
Appreciation, graduations, birthdays, saying good-bye to a friend and/or Thank
You gifts for the perfect host or hostess. I enjoy creating something special
for each of these individuals who have touched my life. I hope this collection
inspires you to step into your craft room and create gifts for those special people
in your life.

makes a simple “I’m thinking of you” trinket into something really special. My
mother-in-law is a fan of a particular organic lip balm that is only sold here
in the mid-West called Chicken Poop (go ahead, you can giggle). I wanted to
send one to her for her birthday (along with her other presents), but I didn’t want
to place the lip balm into the box as if it were an afterthought. This lip balm
holder makes the lip balm a special gift just for her.

the lip balm holder is easy. Once you have the completed your first one, you
will want to use this little gift holder over and over again. First, cut two
pieces of paper each measuring 3 ½” x 5 ¾” (one piece will be the outside you
decorate and the other piece the inside of the holder). Next, score your outer
and inner pieces at 2 ½” and again at 3 ¼” (set aside).
take the inside piece and using a craft knife make the cuts pictured on the above right photo.
These cuts will accommodate a Chapstick
size lip balm. However, you can adjust the top cuts to accommodate any size lip
balm.
adhesive to the outer lip balm piece, paying particular attention to the edges and
the center where you will run a piece of ribbon to create a closure. I use
about 20” of ribbon so I can create a nice bow. Before adhering the two pieces,
make sure to lift the cut areas. You don’t want to accidentally tape the pieces
down after taking the time to make the cuts. Adhere the two pieces together and
embellish your lip balm holder.


future. I created it using a 5”x7” Plexiglas sign holder purchased from
my local office supply store. The kit
and coordinating supplies make this an easy, but beautiful gift. My one piece
of advice, don’t be afraid to add dimension to this project by placing some
elements inside the Plexiglas, while placing other embellishments on the
outside. Ranger’s glossy accents is a
wonderful adhesive when working with plastic.

caught doing this. We visit Pinterest
for creative inspiration, and invariably we spend more time pinning then we do
creating. Well, this project was born from my need to actually use a Pin. There are wonderful tutorials on
how to create paper wreaths, so I am going to focus on embellishing. Once you
have created a wreath, and the design options and materials used are endless,
the question is how to finish it.
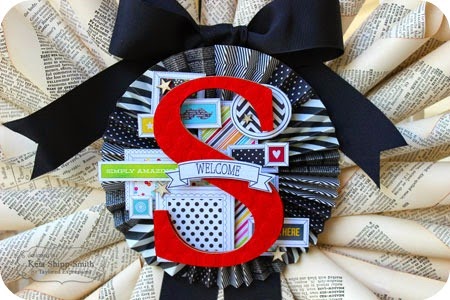
creating my wreath from aged dictionary pages, I fashioned a rosette using 16,
3”x3” squares (scoring every 1/4”), which complemented the black script on the
pages. All the patterns in Simple Stories’ DIY
Boutique paper pad are gorgeous. However, the sheet with the portrait style
pattern was calling to me. Often, we see that type of pattern and think, “How
am I to design using this?” I find quirky patterns a wonderful opportunity for
me to step outside my comfort zone. In this case, I cut the pattern pieces into
their defined shapes and created a collage for my centerpiece. Creating a
collage is equally about the materials used and the shape/design those material
make when creating your piece. I used foam adhesive to create varying depths and
interest for my background. A little
ribbon and my wreath is complete.
with June’s kit, I can write that I don’t have very much paper left. However, I
do have some wonderful gifts to give to friends and loved ones. My hope is that
you, too, will have the same dilemma. Happy crafting!


