Mar 23, 2021
Stamp Joy 2020 Exclusives are NOW AVAILABLE to Purchase!
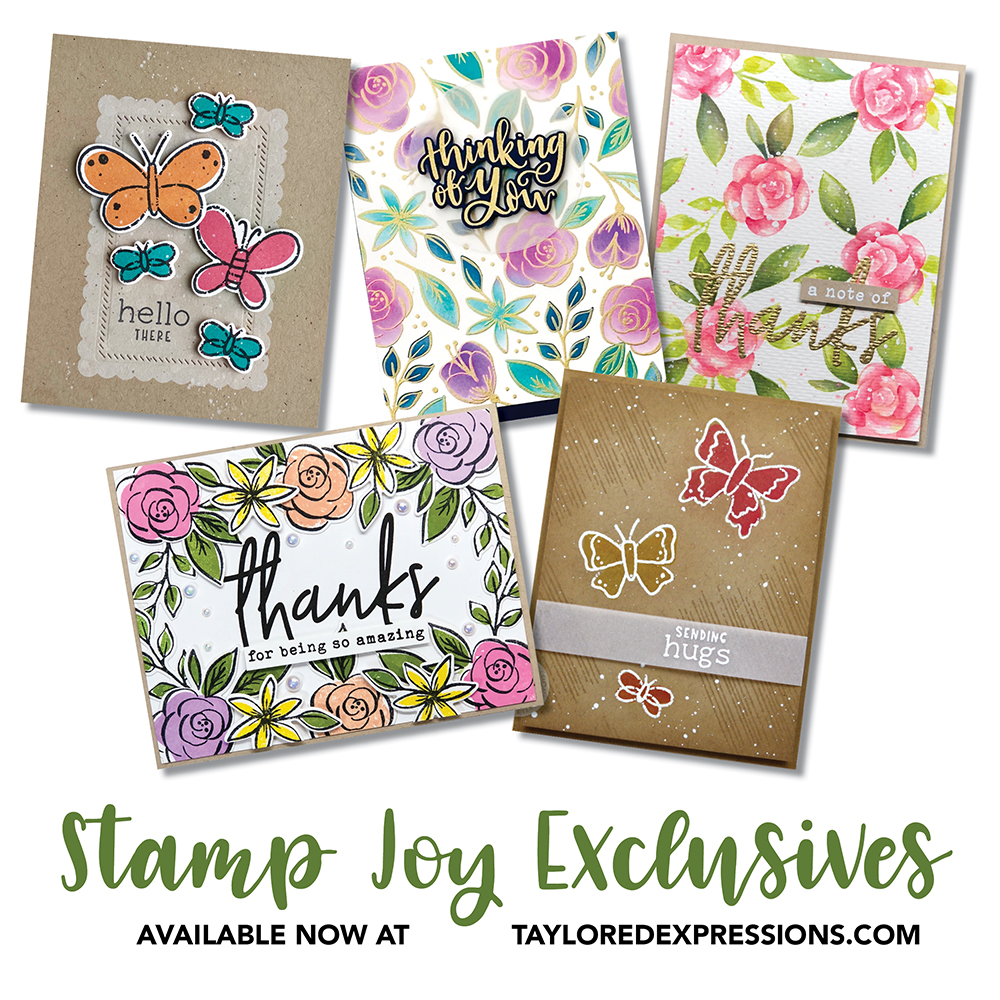
Hey, crafty friends! It’s Taylor here today! Our Spring Stamp Joy event is coming up this weekend! Will you be joining in the fun? Stamp Joy is our 2-day virtual card-making event packed with techniques, tips, tricks, and lots of fun with some of the best designers in the industry! I can hardly wait! If you missed out on our Fall Stamp Joy event, then you’ll want to pay special attention to the new products releasing today. All of these goodies were included in our Fall event class and goodie bag, and are now available for purchase! And the Creative Team and I have been busy whipping up new inspiration!
Click above to shop for the exclusive Stamp Joy products and then keep scrolling to see today’s inspiration, starting off with a video from me!
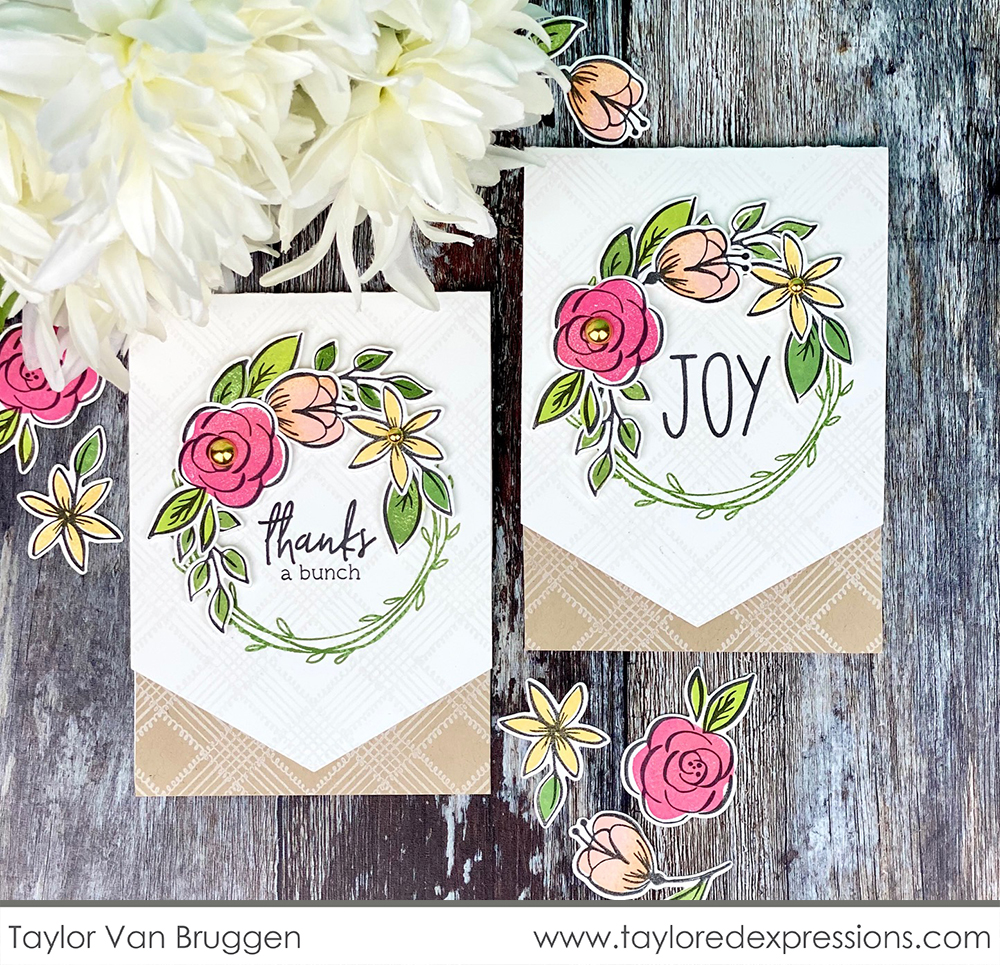
I grabbed the Full of Flowers Singles stamp set and coordinating dies for these two cards. These stamps and dies were offered free with a qualifying purchase during our Fall Stamp Joy event so even if you attended, you might not have these in your collection. The Singles stamps match up perfectly with the images in the Cling & Clear Background which allowed me to use the clear stamp fills to quickly add color to the images.
I knew I wanted to create a wreath using the flowers and I thought the Farmhouse Wreath would make the perfect backdrop for my floral wreath design. I used the Playful Plaid background which is quickly becoming one of the most-used background stamps in my collection. I stamped it in Sea Salt ink onto the Sugar Cube cardstock and in Sugar Cube ink on the Toffee cardstock.
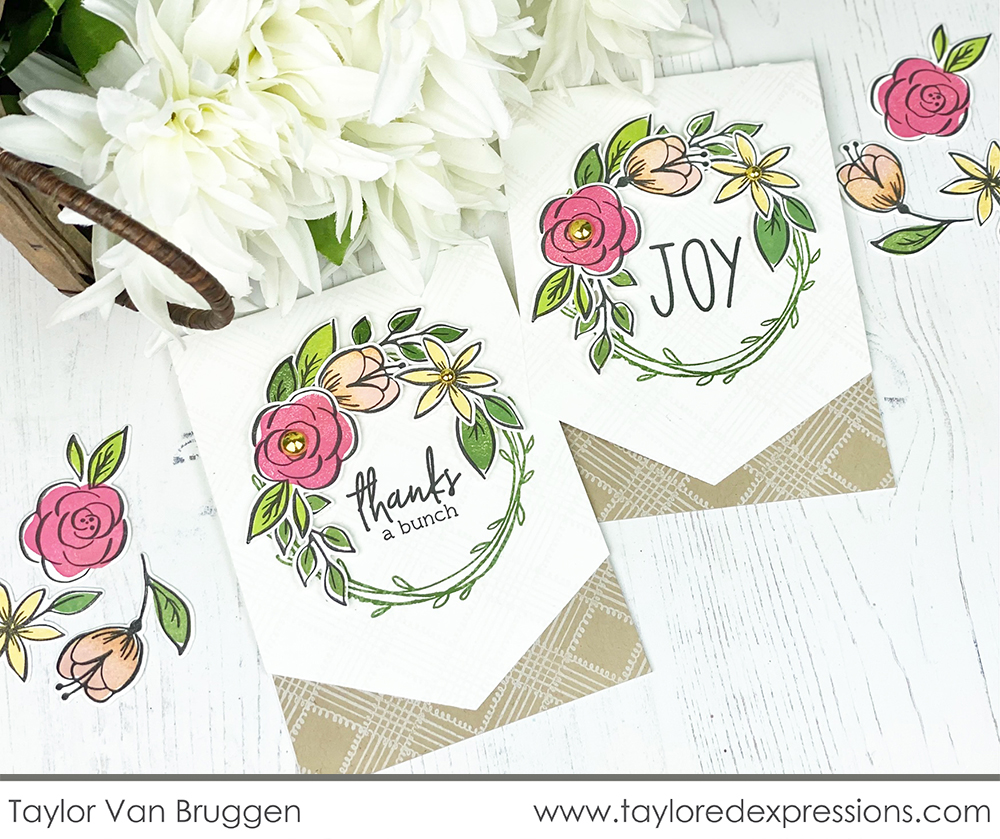
For an unexpected element, I die cut the front of the A2 card with a die from the Pennant Stacklets set to create the ‘V’ in the flap. Don’t miss the ‘Press ‘n Seal’ tip in the video – such an easy way to keep the floral arrangement in place while adding your adhesive.
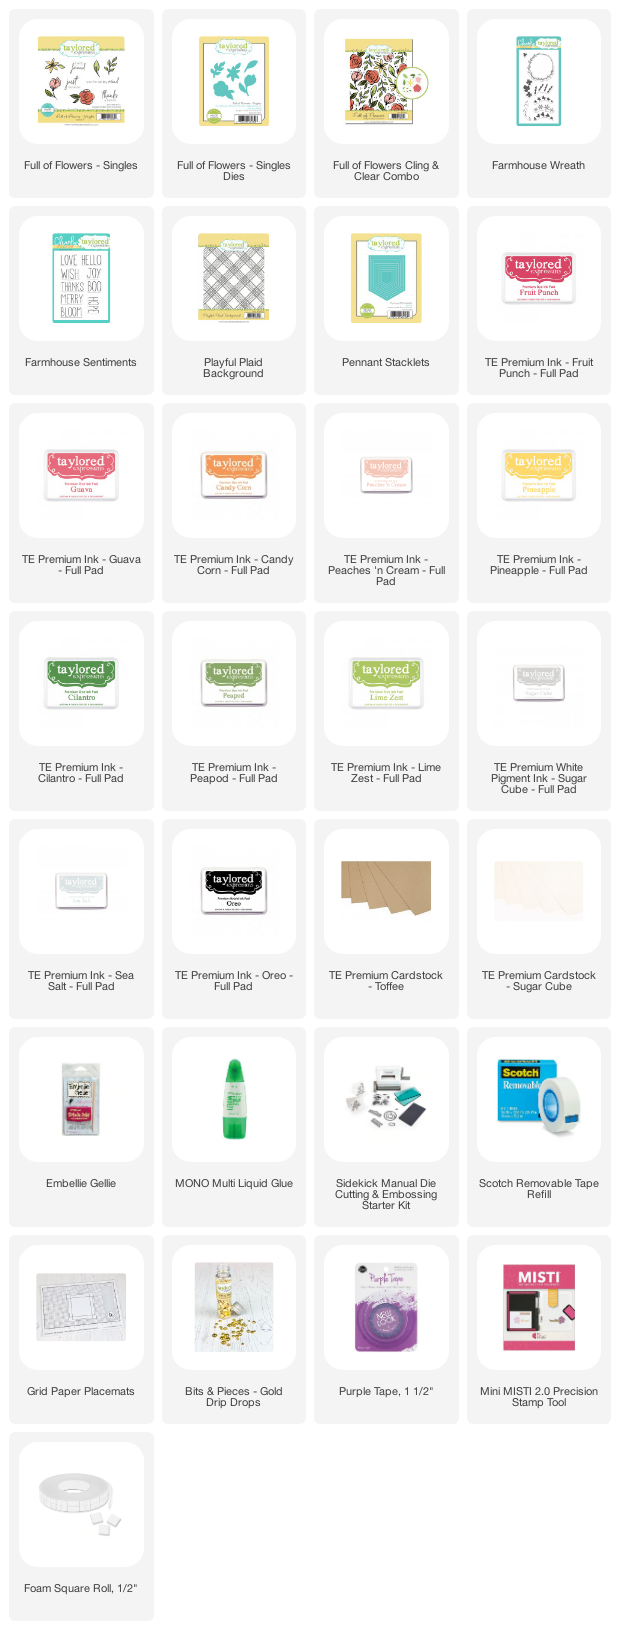
Here’s a closer look at all of the products that are now available along with inspiration from the TE Creative Team:
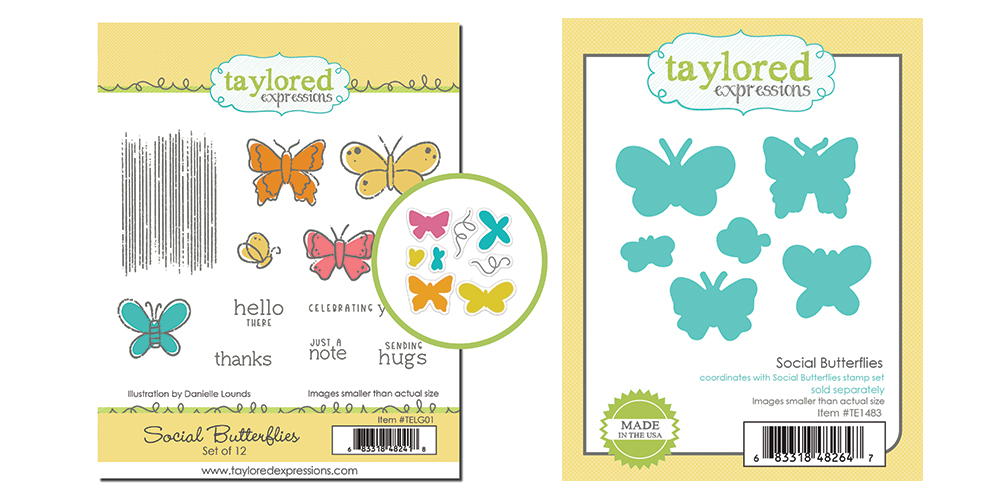
The Social Butterflies Cling & Clear Combo includes 6 different butterflies with a distressed line style to set your projects aflutter! Stamp the outline images and add color to the butterflies using the included clear stamps – the fills aren’t designed to line up perfectly, adding to the whimsy and charm of this set! There are six sentiments in the set that cover a wide number of occasions as well as fun details to step up your projects. Cut the butterflies out using the coordinating die collection.
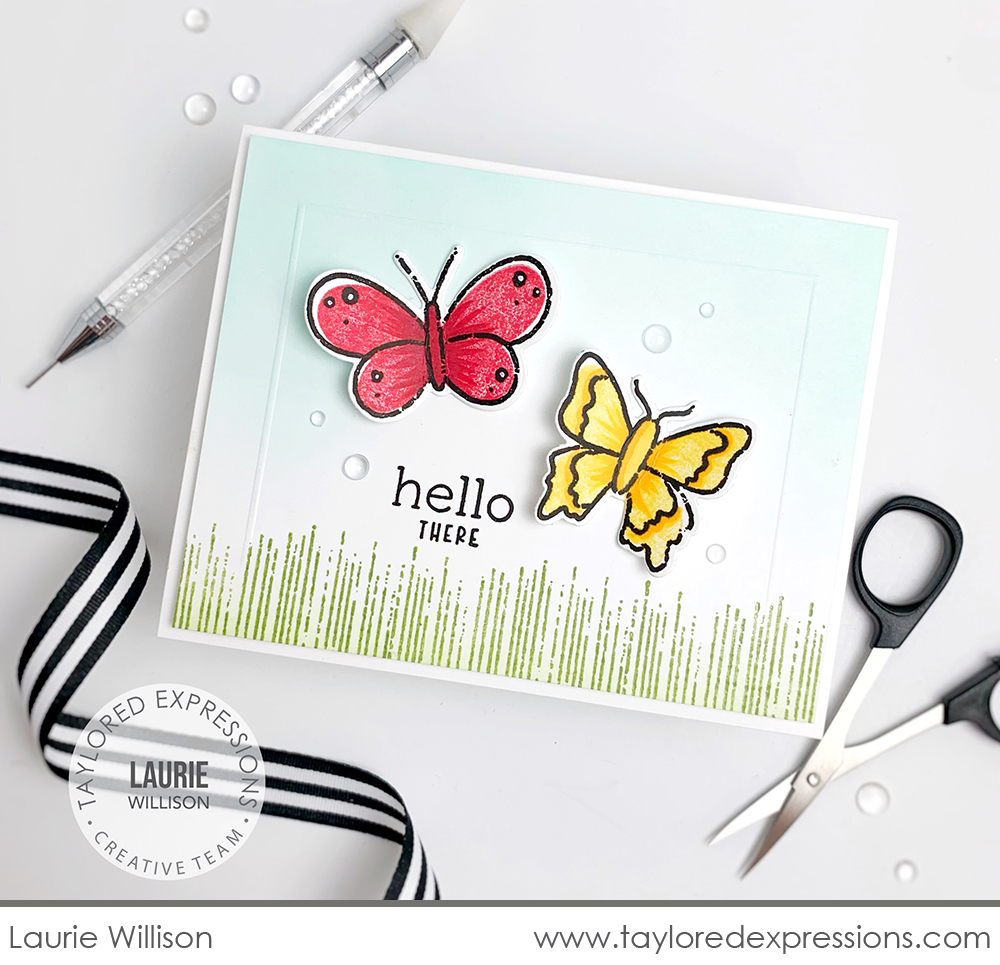
Laurie Willison created a pretty scene with the Social Butterflies Cling & Clear Combo set that makes me think of a spring meadow! She used the line texture stamp in the set to create a grassy border along the bottom of the card and added a few butterflies fluttering above it. I love the details that Laurie added to the butterflies using Copic markers and a white gel pen. Take a closer look at the card to see a few more great details like the embossed frame around the butterflies and the Bits & Pieces – Clear Drip Drops!
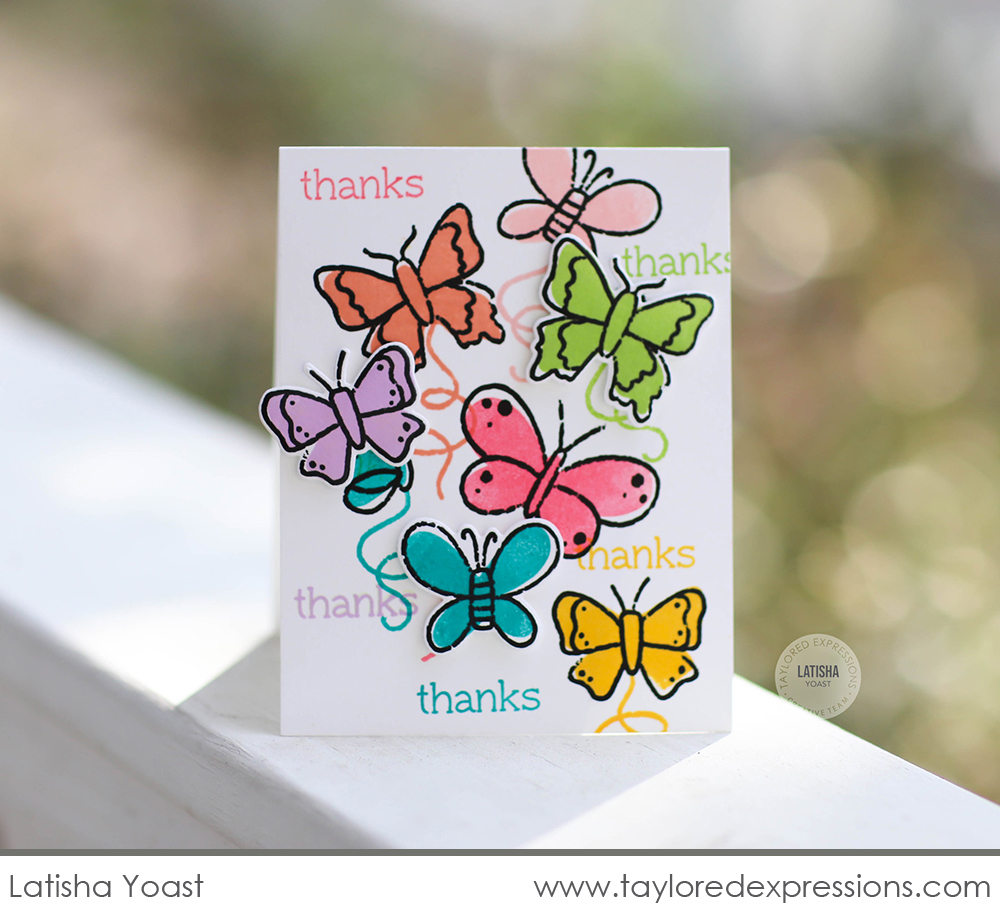
The butterflies on this card by Latisha Yoast are definitely being social! Latisha stamped the butterflies from the Social Butterflies Cling & Clear Combo set in a rainbow of colors, some directly on the card front and some die cut and popped up with foam squares for added dimension. I love how she matched the butterfly trails to the different colored butterflies on the card and how she stamped the ‘thanks’ sentiment multiple times throughout her card design.
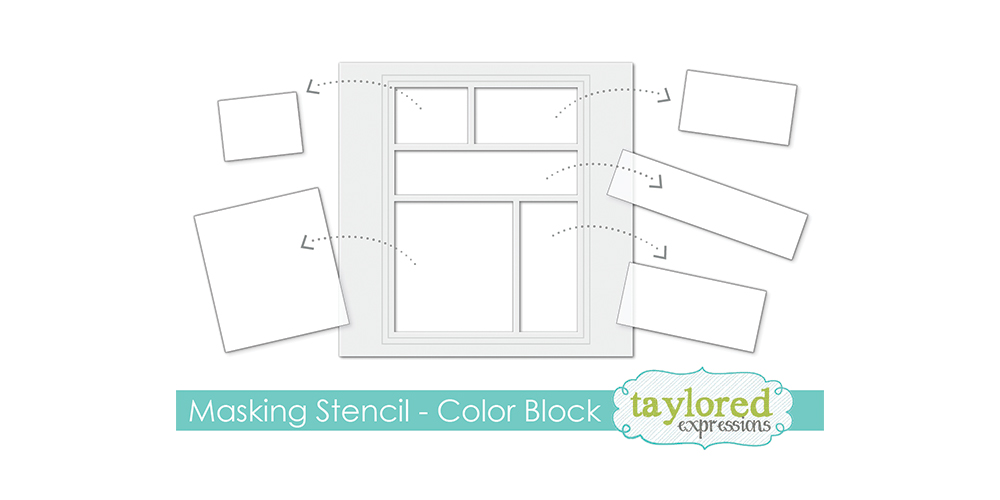
Creating a color block card design just become a breeze with the new Masking Stencil – Color Block set. Use the innovative etched alignment guides to center the color block perfectly on an A2 card and add ink through the stencil with your Blender Brushes. Use the insert shapes for more masking possibilities!
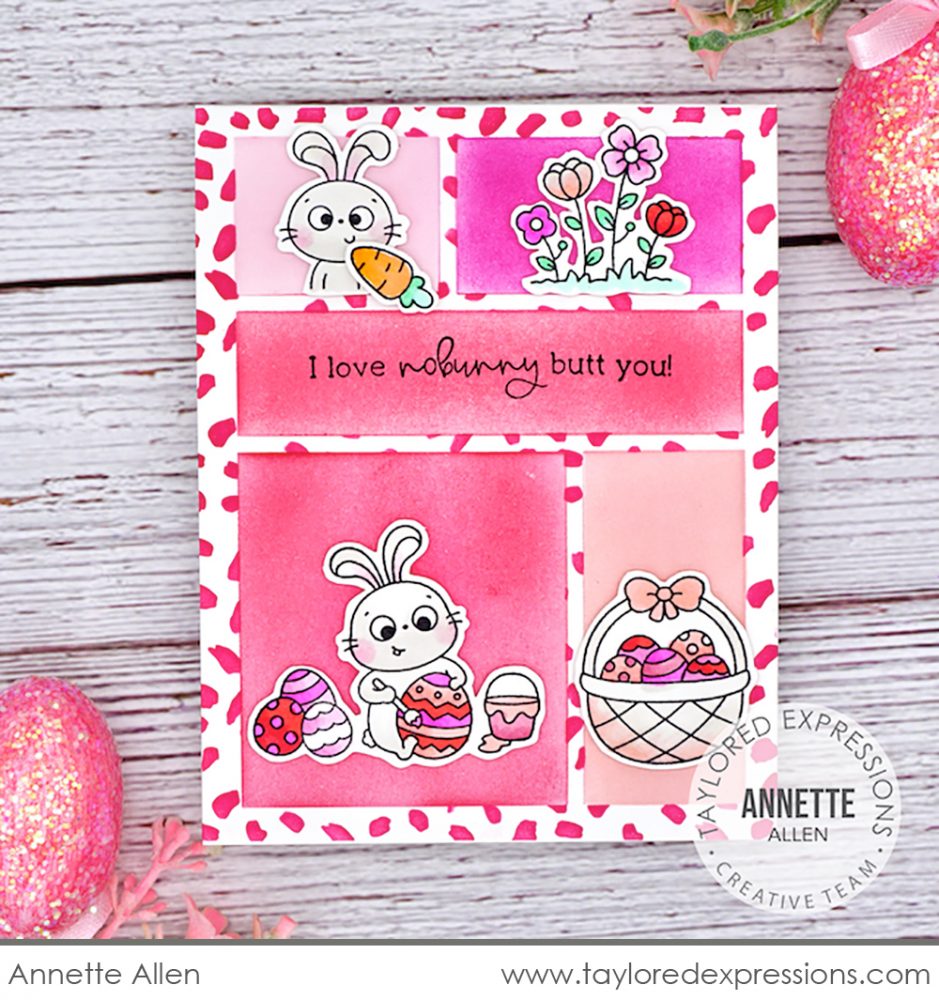
Annette Allen used the Masking Stencil – Color Block set to create a bright and fun Easter card! She added the color blocks in different shades of pink on her card front and then masked them off with the insert shapes to add the background pattern using the Paint Swatch stencil. Annette set the cute images and sentiment from the Springtime Smiles stamp set into the blocks.
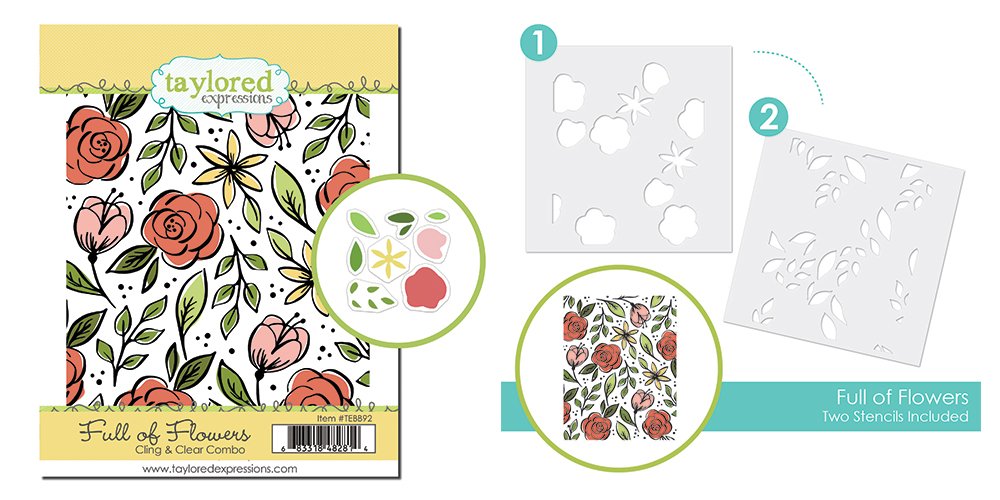
Fill up your card front with colorful flowers using the Full of Flowers Cling & Clear Combo set! Stamp the outline images with the red rubber background and then add color using the fill stamps in the clear stamp set.
Another option for adding color to the background image is the coordinating Full of Flowers stencils. There are two stencils in the set: one to add color to the flowers and one to add color to the foliage. Use your Blender Brushes to create endless color ways.
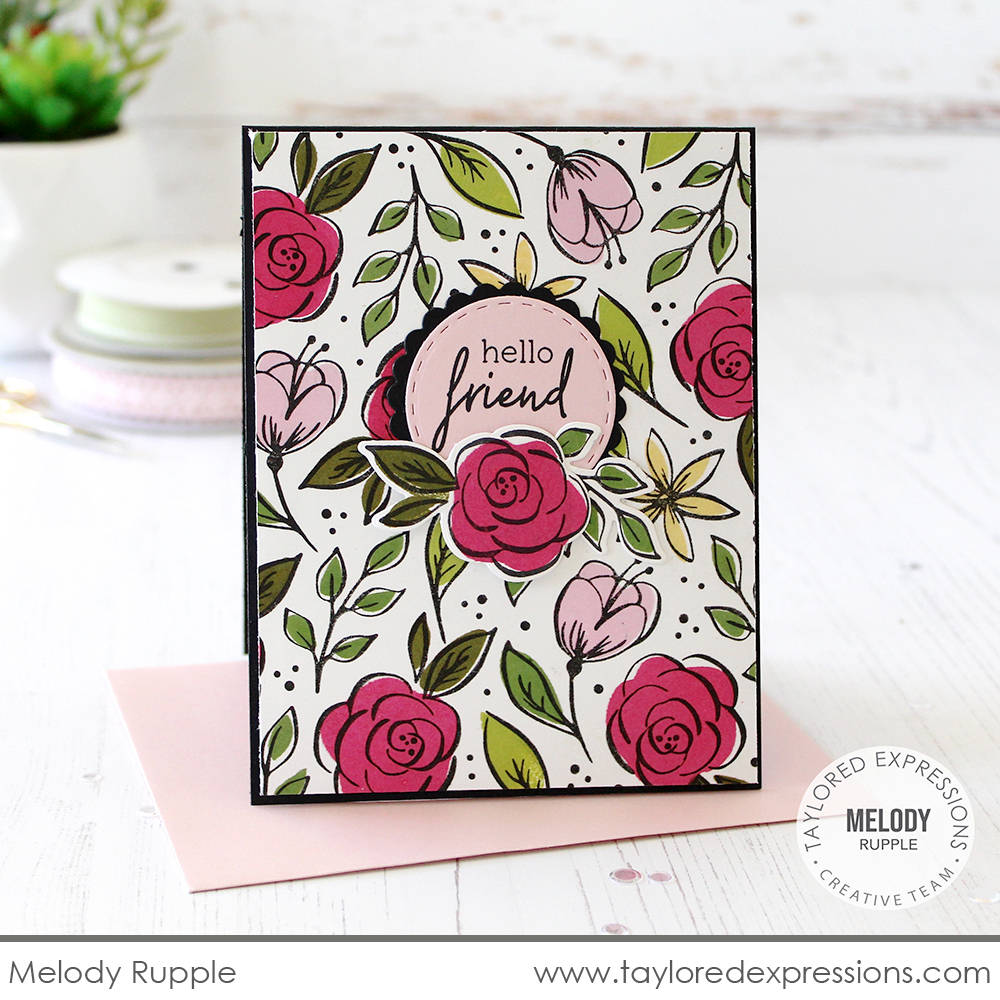
A beautiful floral card like this one created by Melody Rupple is perfect for sending a ‘hello’ to a dear friend. The background image is stamped with Oreo ink and the color is added using the filler images that are a part of the included clear set. Melody added the ‘hello friend’ sentiment to a sweet scalloped circle that she created with the Petite Scallop Circle Stacklets and Stitched Circle Stacklets dies. The final touch is a single flower added below the sentiment using the Full of Flowers – Singles stamp set that you’ll get more details about in just a little bit!
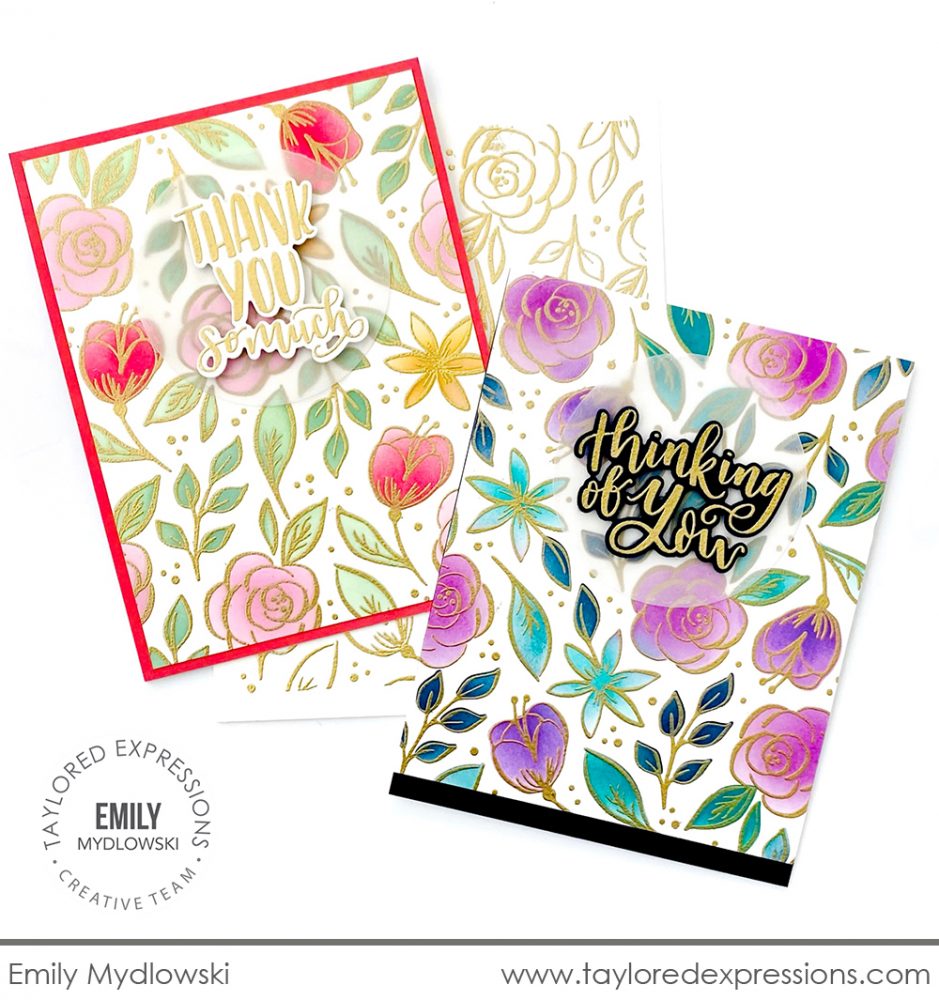
Emily Mydlowski embossed the background image from the Full of Flowers Cling & Clear Combo set in gold a few times and then used the coordinating stencil set to add the color to the flowers and foliage. She did a few different color combinations using her Blender Brushes and I love the different looks that they give the finished cards! The sentiments on the cards from the Handlettered Sentiments stamp set are embossed in gold and cut out with the coordinating dies. Emily layered them onto the card front over a vellum circle to help them stand out, but not hide the pretty floral background.
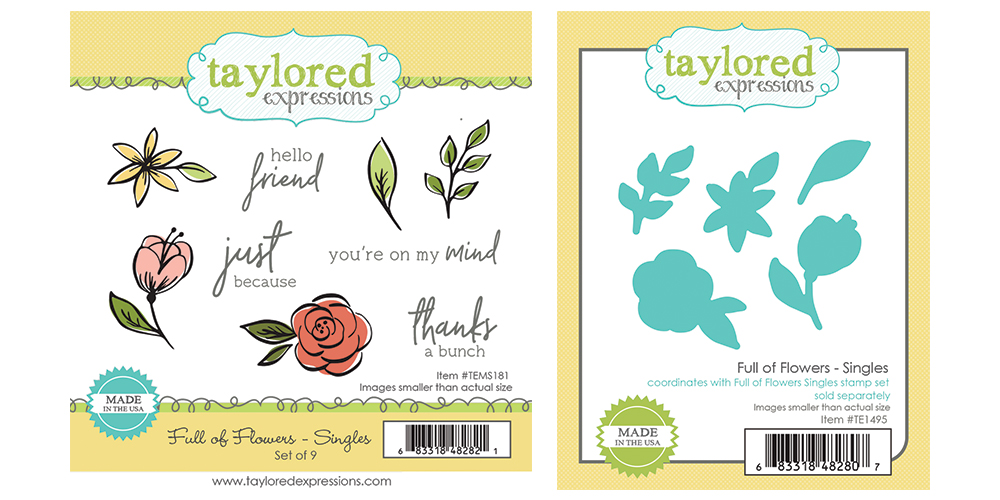
The Full of Flowers – Singles stamp set includes the same floral and foliage elements from the Full of Flowers Cling & Clear Combo set along with four heartfelt sentiments. You just saw this set in my video above! It’s a great way to add extra florals to your projects created with the Full of Flowers Cling & Combo set or use the images on their own and pair with the coordinating dies to build your own floral arrangement.
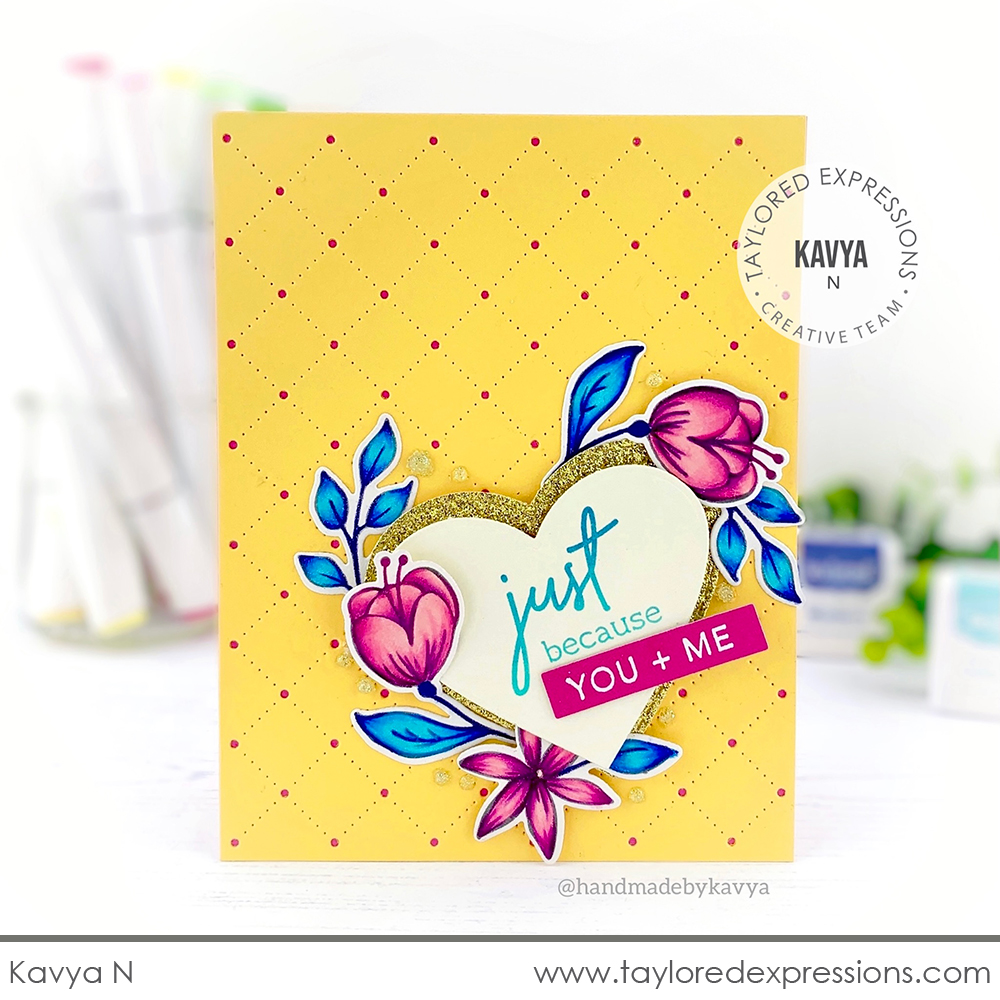
Kavya used the flowers from the Full of Flowers – Singles stamp set, colored with a no-line technique, to encircle a die cut heart on her card. I love the bright and fresh color combination and how she layered the Pierced Lattice Cutting Plate die cut from Pineapple cardstock over a Lollipop card base. The ‘just because’ sentiment is paired with the ‘you + me’ phrase from the Building Blocks – Love Additions stamp.

Finally, for today, is this stunning card by Arjita Sepaha Singh! She stamped the rose image and greenery from the Full of Flowers – Singles stamp set in a light tone ink color on watercolor paper and then added color with watercolor paints. The ‘thanks’ from the Big Thanks stamp set is embossed in gold over the floral background and Arjita added the ‘a note of’ phrase embossed in white on a Toffee cardstock strip.

Join me live for “T Time” at 1pm Central today on the Taylored Expressions Facebook Page. I’ll be sharing a closer look at the exclusive Stamp Joy products that are now available to purchase. We hope to see you there – come join in the fun!
Thank you so much for stopping by today! You can check out the projects that the TE Creative Team made using the exclusive Stamp Joy products by clicking their faces below so you can hop to their blogs. Check back here later this week for more inspiration, including a video from Emily Leiphart. See you then!