Mar 03, 2010
Introducing You’re My Hero
It’s time for another exciting release week at Taylored Expressions! We have some amazing new products including three new stamp sets, and two Key Ingredients kits available for purchase on Friday, March 5th at 8AM PST! But of course we can’t wait that long to start showing you what’s coming so sneak peeks start today!
 Each quarter I have the pleasure of introducing a stamp set designed with a specific charity in mind. Taylored Expressions is proud to donate a portion of the proceeds from the sale of these stamp sets to charity and this month’s charity is especially close to my heart. We all have people in our lives who inspire us to live differently whether they know it or not. And today I want to tell you about one of those people in my life…our 10 year old neighbor Darrin. We met Darrin shortly after we moved to Iowa. There are a bunch of boys around the same age who live in our neighborhood and we’d always see them playing together outside. But Darrin was different. Not only because of his patchy hair and thin stature, but I could see it in the brightness of his smile…that grin could light up a whole room! We soon learned that Darrin had battled cancer during the previous year and was in remission. Toward the end of the summer he had a checkup and it was determined that the cancer had returned. We watched as Darrin went from playing carefree in the street to enduring painful headaches and battling through treatments. Darrin’s battle with cancer came to an end on November 16th and he was free. Free from treatment, free from pain, free to go ‘home’. While I’ll never understand why Darrin had to endure so much during his short life, I do know that he is an inspiration to many and he is deeply missed.
And so I am proud to introduce the You’re My Hero stamp set in memory of Darrin. Taylored Expressions will donate $7.00 for every You’re My Hero stamp set sold during the months of March, April, and May to CureSearch. CureSearch unites the world’s largest childhood cancer research organization, the Children’s Oncology Group, and the National Childhood Cancer Foundation through their mission to cure childhood cancer. Research is the key to the cure. Jon and I will be participating in the CureSearch walk along with Darrin’s family and friends in May. If you’re not inclined toward the Rock Star theme, but you’d still like to support CureSearch you can click here and donate directly to our CureSearch walk in honor of team Darrin to Believe.
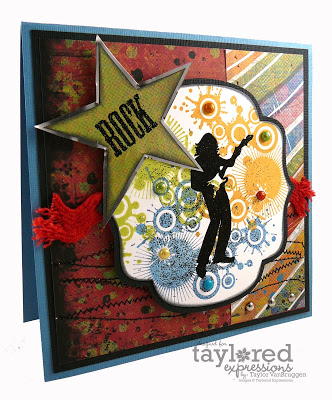 Now let me tell you how excited I am about this set of stamps! The amazing images were designed by Nancy McKinney and they’ll bring out the inner rock star in all of us! I started by stamping the bold background image in three different colors (Lime Pastel, Yellow Ochre, and Brocade Blue). Then I stamped the guitar rocker over the top in Versamark ink. I sprinkled Black embossing powder over the image and instead of tapping off all of the powder, I left bits of it on the image. I like the splotchy look it left behind after heating. Then I randomly stitched on the bottom half of the card with my sewing machine. All of the patterned paper, cardstock, and embellishments (ric rac, glitter brads) are from the Rock Star Key Ingredients also available at the TE Store on Friday. While I’m thrilled with how this card turned out I am even more excited about this next project! I’m always
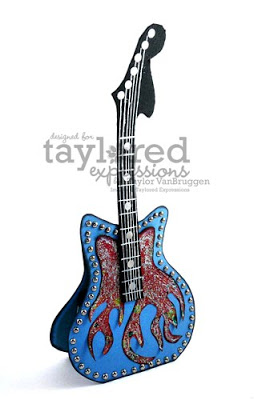 looking for a “cool” way to connect with the teens in my life and I seem to fall back on the iTunes gift card a lot. So since the gift is pretty “standard” I try to come up with a non-standard gift card holder. I think this is it! What do you think of my guitar gift card holder? I’ve created a template for the project so that all of you can make this same project. It’s easy to trace or print the template onto cardstock or patterned paper
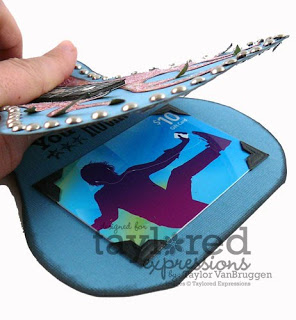 , cut apart, and assemble. I added silver brads all the way around the guitar and Crystal Stickles to the flames. The strings on the neck of the guitar were drawn on with silver paint pen and the circles were punched out from the metal sheets included in the Rock Star Key Ingredients. You can see the gift card inside this closeup photo. I used black photo corners to hold the gift card in place.
I have one more thing to show you before I leave you today! If you’re new to Taylored Expressions you may not be familiar with our stamps. So I’d like to take a minute to share a little more about our stamp sets. Taylored Expressions stamps are made from high quality, deeply etched pink rubber and mounted on EZ Mount cling cushion for use with an acrylic block. Most of our stamp sets are already die cut for you so they’re ready for you to start stamping just as soon as they arrive on your doorstep! However, the stamps sets we release as a part of the TE Giving Tree program are the exception. These stamp sets will need to be trimmed from a sheet of rubber before they’re ready to be used. We made this decision in order to save on manufacturing costs, allowing us to maximize the amount we’re able to donate to charity. We feel it’s worth the little bit of extra effort and we hope you’ll agree! To help you with the trimming of your Giving Tree stamp sets I have some tips:
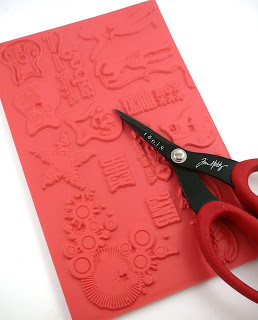 1. Here’s a picture of how the stamp set will arrive. You’ll need to pull the sheet of rubber from the sturdy plastic panel in order to begin cutting out the images
. You’ll also need a good scissors. My personal favorite is the Tim Holtz Tonic Scissors. This pair of scissors has cut out more stamp sets than I can count and it still cuts the rubber like butter!
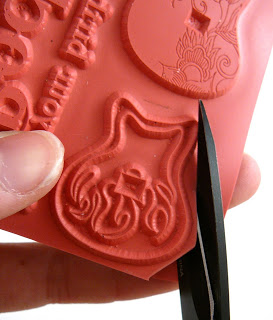 2.Start trimming each image by making straight cuts around the lines of the image. You don’t want to leave too much space around the outside because your ink can get on the excess and leave a mark when stamping. You also want to be sure not to trim too closely to the lines on smaller images so as to leave enough cling mount to allow the back of the stamp to stick to your acrylic block. The sturdy plastic index that comes with your stamp set serves several purposes. First, it shows you exactly how many images are in the stamp set so you know how many you should have when you’re finished trimming. It can also be your color inspiration as you begin to create. And it comes with binder holes already cut and sized to fit exactly into our Mini Binder Box for storage.
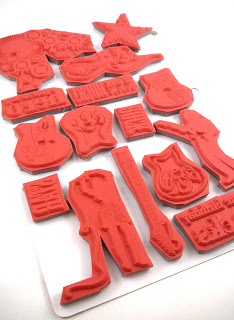 3. After all of your images have been trimmed you can place them on the back of your panel for storage. The EZ Mount cling cushion allows them to stick to the back of the laminated surface.
Alex Maldonado, Carolina Buchting, Charmaine Ikach, Donna Baker, Jackie Pedro, Jeanie Witmer, Jodi Collins, Karen Giron, Karen Motz, Melissa Sauls, Nancy McKinney, Sankari Wegman


